Material Editing
Attention
Please make sure you have read these guides before continuing here
HEIO allows for editing .material files which can be done either in the context of a model or in isolation.
Importing
Usually, materials are automatically imported as part of a model or similar, but if you just want to edit one or multiple material files, you can do so by importing them directly.
Import to project
If you just want to import materials into your project without automatically adding them to any model open the importer, select your file(s) to import, configure the import properties and then confirm.
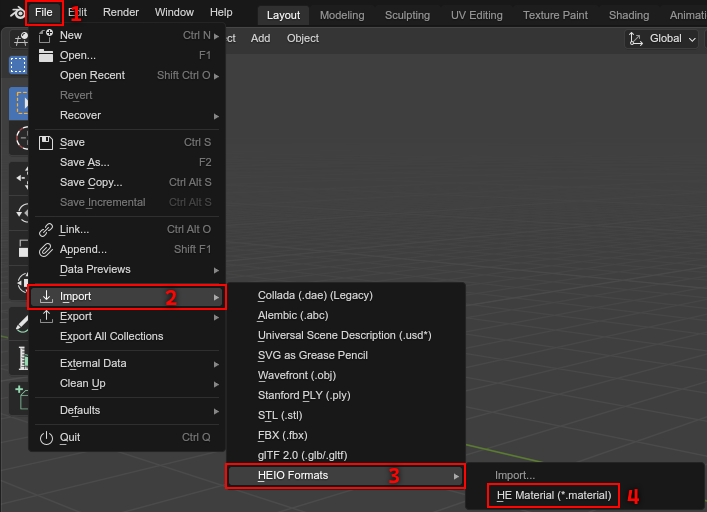
Where to find the importer
Import to project and add to model
To import materials to a specific object, first select the object that the materials should be imported to (must be a mesh), then open the importer from the specials, select your file(s) to import, configure the import properties and then confirm.
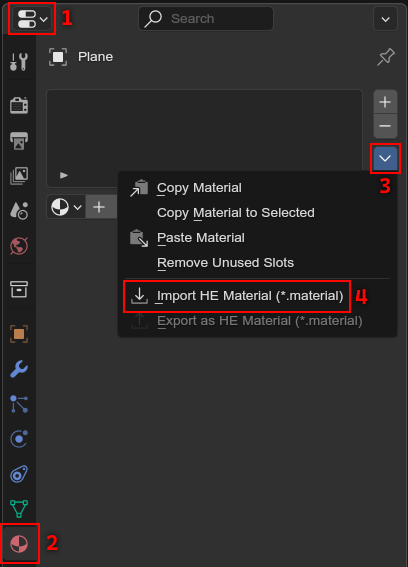
Where to find the importer
Texture images during import
Images used by materials can also be imported; If Import images has been disabled in the import
properties, or an image file was not found / could not be read, the addon creates a 16x16
placeholder texture in its place based on the connection of the template material.
Editing
The addon does not attempt to get export-data from the materials node tree. Instead, HEIO does it the other way around: All edits are done from within the HEIO Material Panel.
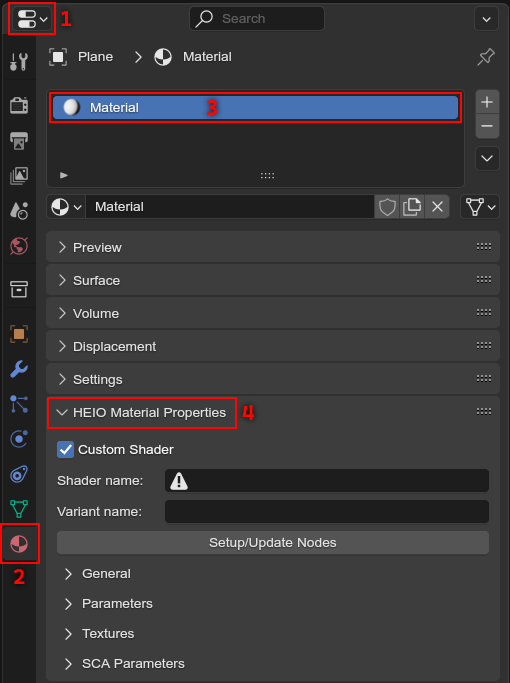
Where to find the HEIO Materia Panel
Whenever an HEIO Material property is edited the addon will (try to) update the materials node-tree accordingly to allow for a realtime preview, but this can only occur if the used shader has a properly set up material template, which is not the case for the majority of shaders. For that reason, most shaders will use a generic fallback template and may end up looking inaccurate to ingame.
See also
Setting up the shader
The heart of every material is its shader: A shader is essentially a small program telling the GPU how a model gets rendered. Materials tell the game which shader to use as well as passing over options like parameters and textures to be used by the shader.
Every game has its own list of shaders. A full list of the usable shaders for each game can be found here.
If you created a new material, it will be set up to use a custom shader and have no shader set. Custom Shaders are only useful if the shader you want to use is somehow not set up for the target game, or when you want to use a custom shader.
In 99.9% of cases, you dont need to use the custom shader feature, and can disable it. Upon doing so, the shader name textfield will be swapped out for a dropdown.

Difference between a custom shader and a preset shader
By default, the list of shaders is (usually) a small selection of commonly used shaders from the larger shader list. If the shader you want to use is not part of the selection, enable “Show all shaders”.
If no shader is selected, the addon will show a warning sign in the property. Always make sure to select a shader!
Shader variants
Hedgehog Engine 1 games made use of “shader variants”, which are shaders with specific
technical features, like enabling bone deformations or vertex colors. Each character in a
variant name denotes one feature, e.g. b may enable bone deformation.
If a shader has variants, you can select those via a second dropdown.
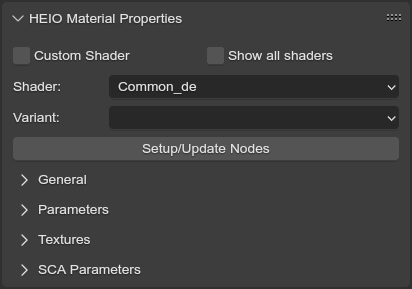
Available shader variants for the shader Common_de for Sonic Unleashed
Each target games shader features and their purposes are documented here.
Node Setup
After selecting the shader (and variant) that you want to use, its time to set up the nodes. This is done entirely automatically by the addon, and you should never have to interact with the nodes of an HEIO material.
To generate the nodes, simply click the Setup/Update nodes button.

Additionally, whenever you change any of the HEIO Material properties, the addon will automatically update the values and images inside the node tree!
Note
This is done automatically on import!
You only (and always) have to press it after changing the shader of a material yourself.
Material Properties
Materials have 3 types of properties that change how the shader behaves:
General
These are direct material settings that are strictly part of every material.
Clip Threshold and Backface Culling are default blender material properties added here for convenience and have the same effect ingame as they do here.
Use additive blending does exactly as it says: Instead of alpha blending, it makes the shader use additive blending.
Parameters
These are values that get passed to the shader, like a diffuse color or similar.
Every shader can define their own custom parameters, of which the usage is fully up to the shader itself and may need fiddling and/or reverse engineering to figure out how they work.
For more detailed information about parameters, read HEIO Material Parameters
Note
All shaders, even those that dont actually use them, have the following parameters:
diffuse
specular
ambient
emissive
power_gloss_level
opacity_reflection_refraction_spectype
These are legacy hedgehog engine 1 parameters, and are part of ever shader to ensure compatibility with every engine and tool.
Caution
Changing the shader preset will add new parameters with their default values and remove old unused parameters. Be aware of this when trying out a different shader or similar!
Textures
Textures are very simple: You have slots with certain types, and these get used by the shader for various purposes.
For more detailed information about textures, read
Important
Textures are exported using the Blender DDS Addon, which allows you to set the DDS encoding to use when exporting for each image.
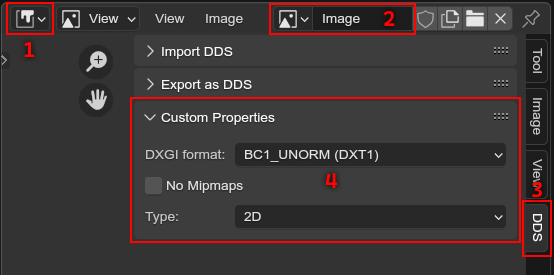
Where to find the DDS encoding settings
SCA Parameters
SCA parameters are additional information that can be attached to a file in Sonic Lost World and games released after.
For more detailed information about SCA parameters, read
Exporting
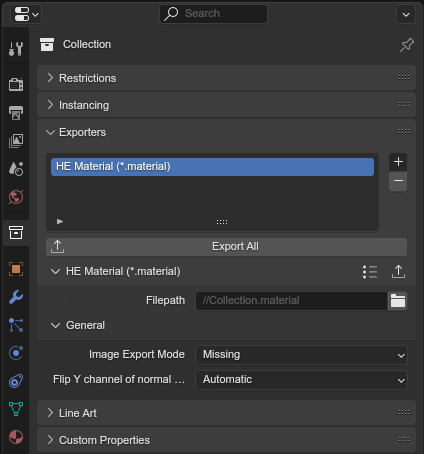
Once you are done editing your material(s), they can be exported as .material files. Usually, this is done automatically by e.g. the model exporter, but you can also export materials independently.
Important
Materials are exported to files with their names!
E.g. a material with the name MySonicFur gets
exported as MySonicFur.material, so make sure that your materials are correctly named before
exporting!
Warning
If you want to export images too, you need to have Blender DDS Addon installed!
Batch export materials
The standard way of exporting materials is to export all materials of specific objects. Which objects get picked depends on the “limit to” export properties.
To export materials of objects, open the exporter, select a directory to export to, configure the export properties and confirm.
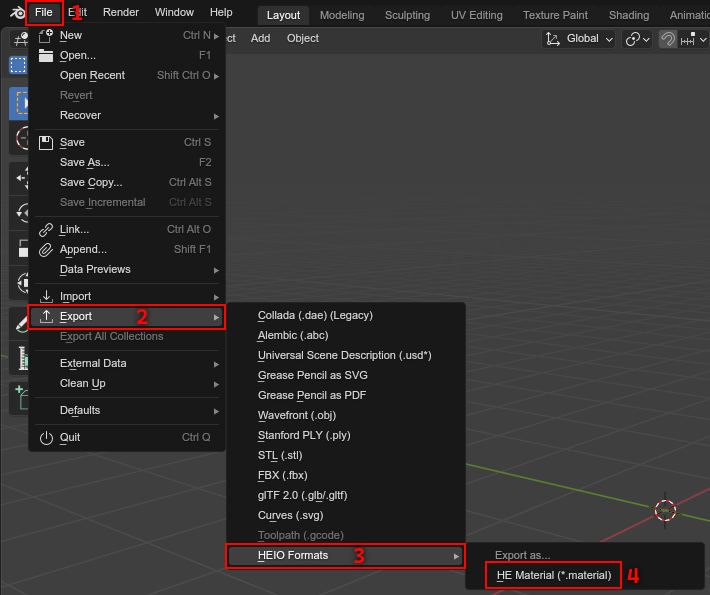
Where to find the exporter
Export a single material
You can export a single material by selecting it, opening the exporter in the material specials, select a directory to export to, configure the export properties and confirm.
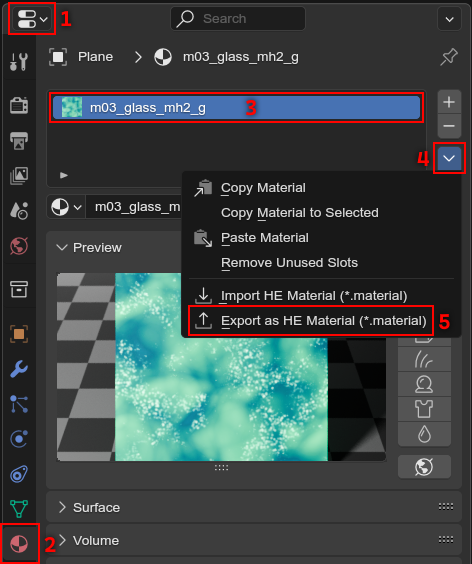
Where to find the exporter
